Saturday, January 13, 2007

Corrosion Testing Services Offered by Bodycote Testing Group

Bodycote Testing Group provide one of the most comprehensive range of corrosion testing facilities available. Amongst this range are: -

· Sour Service Corrosion Testing, both Small Scale Tests and Full Ring Testing

· Consultancy

· Materials Selection

· Electrochemistry

· Autoclave Testing

· Inhibitors

· Environmental Conditioning / Salt Spray Testing

· Routine Tests

· Group Sponsored Projects

· Weldability Trials
Sour Service Corrosion Testing

Testing in Hydrogen Sulphide containing environments is undertaken in a number of the Group's laboratories. The most extensive facility is situated at the Bodycote Corrosion Centre, where our specialist sour service centre has been established.

The laboratory holds UKAS accreditation for the following: -

· Full Ring Testing (OTI 95 635)

· SSCC (NACE TM 0177, EFC 16 and 17)

· HIC (NACE TM 0284)
Full Ring Testing

The laboratory is capable of handling large numbers of samples, up to 52” diameter in the case of full ring tests.
Consultancy

The Bodycote Corrosion Centre also offers a Consultancy service on corrosion problems. Several senior consultants with many years’ experience are available to help and advise on corrosion or materials selection queries.

Highly experienced and qualified engineers routinely undertake corrosion studies within the Group.
Materials Selection

Correct material selection when a process employs aggressive environments is essential.

At the Bodycote Corrosion Centre, materials selection is regularly undertaken with facilities available for handling the most aggressive chemicals, such as Hydrofluoric acid at elevated temperatures.

Environmental cracking tests can also be performed in similar environments.
Electrochemistry

Facilities are available for conducting electrochemical corrosion tests at ambient and elevated temperatures and pressures.

The available techniques include Zero Resistance Ammetry (ZRA), Linear Polarisation Resistance (LPR), Potentiostatic and Potentiodynamic Polarisation. These techniques can be applied to the study of general corrosion, pitting attack, galvanic corrosion, and preferential weld corrosion.
Autoclave Testing

Corrosion resistant autoclaves are available, for performing corrosion tests at elevated temperatures (up to +250°C) and pressures (up to 250 bar).

The autoclaves can be applied to studies in sour (H2S) and other aggressive environments. The autoclaves include facilities for gas changing, sampling and oxygen monitoring at ppb levels.

Several autoclaves from 1 litre to 10 litres are available ensuring that large numbers of samples can be accommodated. Electrochemical, Stress Corrosion Cracking and Pitting / Crevice Corrosion Tests can be undertaken within the autoclaves
Inhibitors

Inhibitor screening and evaluation is another facility available within Bodycote Corrosion Centre. Testing using electrochemical techniques and hydrogen permeation is currently employed to determine the correct choice of inhibitor to give protection in a particular process or environment.
Environmental Conditioning / Salt Spray Testing

A number of environmental test chambers are available within the Group. Salt Spray Testing and CASS Testing is performed on a routine basis.

Specialist chambers can be constructed to accommodate unusual requirements and test conditions.
Routine Testing

A wide variety of routine tests can be undertaken to evaluate the corrosion resistance of materials to general corrosion, pitting corrosion, selective leaching, crevice corrosion and intergranular attack.

These tests are normally performed in accordance with standard ASTM, NACE, DIN, British and ISO methods. Interpretation of test results and advice on the most appropriate test method is available from our team of corrosion engineers.

Bodycote Corrosion Centre is staffed and managed by corrosion specialists who are committed to playing a full role in the development of new test methods and standards. The Group works with clients and various industry bodies such as NACE International, ISO and EFC.
Group Sponsored Projects

The Bodycote Corrosion Centre is currently running a Group Sponsored project entitled ‘Accurate Assessment of Material Susceptibility to SOHIC for Line Pipe and Pressure Vessel Steels’.
Weldability Trials

The Bodycote Corrosion Centre offers a full Weldability Trial Service, this includes manual and automatic welding, mechanical and corrosion testing.

Copper – Fabrication Techniques, Handling, Storage and Cleaning, Supplier Data by Aalco

Copper and copper alloys are amongst the most versatile materials available and are used for applications in every type of industry. World consumption of copper now exceeds 18 million tonnes per annum.

Copper is well known for it’s conductivity but it has other properties that have been exploited in a wide range of copper alloys. These alloys have been developed for a wide variety of applications and numerous fabrication processes employed to produce fished goods.

Suitable Fabrication Techniques

Fabrication techniques that copper alloys are largely suited to include machining, forming, stamping, joining, polishing and plating.

Machinability

The exceptional machinability of some copper alloys means that free machining brass sets the standard of machinability by which all other metals are judged.

Handling and Storage

The procedures for the handling and storage of copper and copper alloys are very similar to those used for aluminium and stainless steel.

Cleanliness

The most important factor is cleanliness. Contaminated copper can be the cause of cracking or porosity during heat treatment or welding. Corrosion resistance can also be adversely affected. Tooling and work surfaces should be dedicated to use with copper materials or thoroughly cleaned before use. If this is rule us not adhered to, cross contamination can occur.

Protective Packaging

Copper sheets should remain in their packaging until required and should be kept separated by protective material to avoid abrasion between the sheets.

Storage

Plates and sheets should be stored vertically in covered racks. All copper materials should never be walked upon.

Ductility and Malleability

The ductility and malleability of copper and copper alloys makes them ideally suited to fabrication methods that involve severe deformation such as:

· Tube forming

· Wire drawing

· Spinning

· Roll forming

· Deep drawing

These fabrication methods require specialised, heavy equipment and skilled operators. If fabrication by one of these methods is required, more information should be sought independently.

Fabrication

Cutting

Most copper alloys are relatively soft and can be readily cut using common hand tools and standard cutting methods.

Damage During Cutting

While the relative softness of copper makes it easy to cut, it is important to protect the component from unwanted damage during cutting. This damage may include, but not be limited to, bending, denting or scratching.

Cutting Pipe and Tube

Hacksaw

When cutting copper pipe, a fine toothed hacksaw may be used quite successfully. To ensure the cut is square to the pipe, a tube cutter should be used.

To hold material for cutting with a hacksaw use a mitre box or a jig consisting of a piece of wood containing a notch to hold the tube or pipe in place.

Pipe Cutters

When a pipe cutter is used, it is recommended to grip the copper tubing with a pipe vice or a similar holding device.

After cutting the any burrs need to be removed from the inside and outside of the tube. For this, use a half round file. Pipe cutters tend to cause more burrs than do hacksaws.

Cutting Copper Sheet and Plate

The method employed for cutting copper sheet or plate largely depends on two factors; the thickness of the material and the amount of cutting required.

Thin Gauge Material

For thin gauge material where only a minimal amount of cutting is to be done, tin snips or hand shears may be adequate.

Thick Gauge Material

Thicker material can be cut using a bandsaw or other mechanical saw fitted with a bimetallic blade suited to the cutting of copper alloys.

Industrial Cutting Methods

For large cutting runs or for thick material it may be necessary to utilise one of the common industrial cutting methods like:

· Shearing

· Electrical discharge machining (EDM)

· Laser cutting

· Water jet cutting

· Plasma cutting

· Slitting

· Guillotining

· Abrasive disc cutting

Bar and Flat Bending

Copper and copper alloy bar can be bent using standard bending methods.

Minimum Bending Radius

As a general rule, the minimum bending radius for copper bar is equal to the thickness of the bar.

Tube and Pipe Bending

Most copper pipe/ tube can be readily bent and two main methods are employed. The first uses bending springs and the second, a pipe bending machine.

Bending Springs

The simplest tool for bending pipe is the bending spring. Bending springs are normally used for thinner walls where the pipe can be bent by hand. Two types of spring are used: internal and external. Both types of spring serve the same function; to prevent the wall of the pipe from collapsing during bending.

External Bending Springs

External springs are used for smaller diameter copper piping (6 to 10mm external diameter). As the name suggests, the spring is fitted over the tube during the bending operation.

Internal Bending Springs

Internal springs are placed inside the pipe during bending. Each pipe size requires its own specific size of spring.

Bending Machines

All bending machines are different but the principal is the same.

The bending machine is fitted with a bending roller and former matched to the size of the pipe. The pipe is secured at one end and the lever handle of the machine moved to bend the pipe around the former.

Joining of Copper Components

Copper and copper alloys are more readily joined than most other materials used in engineering.

Although 90% of copper based components are assembled using conventional welding and brazing techniques, they can be successfully joined using every known joining process.

When welding, soldering or brazing copper the joint must be clean and free of dirt, grease or paint.

Soldering

Soldering can be divided into two methods:

· Soft soldering using alloys that melt below 350°C

· Hard soldering using stronger, high melting point alloys

In regard to soldering copper alloys, hard soldering is often referred to as Silver soldering.

Soft soldering normally uses Tin based solders for joining copper and brass when high mechanical strength is not required. The method is commonly used for joining copper in domestic electrical and plumbing applications.

Brazing

With the exception of alloys containing more than around 10 per cent aluminium or 3 per cent Lead, brazing can be used to join all copper alloys.

Brazing is particularly popular for joining copper components used in building, heating, ventilation, air-conditioning and the manufacturing of electronic products.

Welding

Copper alloys are readily welded using all common welding techniques including:

· Arc welding

· Gas-shielded arc welding

· Tungsten inert gas (TIG) welding

· Metal inert gas (MIG) welding

· Plasma arc welding

· Pulsed-current MIG welding

· Electron Beam welding

· Laser welding

· Friction welding

· Ultrasonic welding

Bolting and Riveting

Copper and all copper alloys can be successfully bolted or riveted. However consideration must be given to the material used in the bolts or rivets. As copper is often chosen for its corrosion resistance, the material used in the bolts and rivets should be made from the same or similar material to that being joined.

For roofing applications, copper nails are preferred but brass or stainless steel can be substituted.

Localised Stress Through Mechanical Joining

Mechanical joining like bolting and riveting may induce localised areas of high stress, which could induce failure in the component. Replacing the mechanical joint with adhesive bonding can eliminate this. Adhesive bonding can also be used in conjunction with mechanical bonding.

Adhesive Bonding

With consideration given to joint design so there is an adequate overlap on the joint area, copper and copper alloys can be successfully joined using adhesive bonding.

As copper and copper alloys form a protective surface oxide layer, the surfaces must be cleaned before the adhesive is applied.

Casting

Copper and many copper alloys are ideally suited to fabrication of components by casting.

Sand Moulds

The most flexible casting technique utilises sand moulds. Sand moulds can be used for production runs from simple one-off items to long casting runs. These items can also range in size from a few grams to many tonnes.

Iron Moulds – Die Casting

The other popular casting technique uses iron moulds and is called die casting. Die casting is suited to long casting runs.

Both die casting and sand casting can be used for the low cost production complex near net-shape components. This minimises expensive post casting machining.

Continuous Casting

Bars, sections and hollows that require tight dimensional control are often produced by continuous casting.

Centrifugal Casting

Rings, discs and other symmetrical shapes tend to be produced using centrifugal casting.

Machining

All coppers and copper alloys can be machined accurately, cheaply, with a good tolerance standard and good surface finish. Some copper alloys are specifically formulated to have excellent machinability.

If machinability is the paramount consideration for the material, the material of choice is high speed machining brass.

Machinability Rating

The relative machinability of metals is demonstrated by a percentage rating. This rating system is based on the original free machining brass (CZ121) which has a rating of 100.

Descaling

The surface oxide films that form on copper alloys can prove to be quite tenacious. Often these films need to be removed before some fabrication processes can be performed.

Abrasive Descaling

Very fine abrasive belts or discs can be used to remove oxides and discolouration adjacent to welds.

Pickling

Pickling might be necessary by using a hot 5-10% sulphuric acid solution containing 0.35g/l potassium dichromate. Before commencing pickling, oxides can be broken up by a grit blast. Components that have been pickled should be rinsed thoroughly in hot, fresh water and finally dried in hot air.

Finishing

Copper components can be finished in a vast variety of ways. The finish used for any given copper component is dependent upon function and/or aesthetics.

Oxide Layer

Copper naturally forms a protective oxide layer on exposure to the elements. This layer is normally blue – green and may or may not be desirable.

The blue – green patina develops over time but its development can be enhanced and accelerated by the use of commercially available oxidising agents.

Lacquer Coating

If the tarnished patina of copper is not desirable, the material can be protected using a lacquer coating.

Acrylic Coating

An acrylic coating with benzotriazole as an additive will last several years under most outdoor, abrasion-free conditions.

Painting

In most instances copper and copper alloys do not require painting. The inherent properties of copper resist corrosion and biofouling. Painting of copper is occasionally done for aesthetic reasons. It is also done to reduce the incidence of metal to metal contact of bimetallic couples where galvanic corrosion might be a problem.

Surface Preparation


Before painting copper, the surface of the material should be roughened by grit or sand blasting. Other specific procedures will depend upon the type of paint being used. Please consult the paint manufacturer for details.

Cleaning and Polishing Copper

The best way to keep copper clean is to not allow it to get dirty in the first place.

Where possible, decorative items should be kept clean and free of dust. Many decorative copper items are coated with lacquer to protect the finish. Other than dusting, for these items occasional washing with luke warm, soapy water may be required. They should never be polished as this may remove the protective lacquer.

Cleaning Copper Cookware

To remove tarnish from copper cookware, simply rub with lemon halves dipped in salt.

Cleaning Industrial Copper

Tarnish can be removed from copper in industrial applications using commercial copper polishes. These polishes should be applied following the manufacturers instructions.

Brushed Finishes

If a brushed finish is required on copper or copper alloys, stainless steel brushes must be used to eliminate cross contamination.

Recycling
Copper alloys are highly suited to recycling. Around 40% of the annual consumption of Copper alloys comes from recycled copper materials. Both process scrap and the component, at the end of its working life, can be readily recycled.

Friday, January 12, 2007

Concrete Reinforcing Bar – A Method for Marking Reinforcing Bar

Identification marks on reinforcing bars are now requested by several international standards. Marks must be rolled onto one side of the bar to denote the producer’s mill designation, bar size, type of steel and minimum yield designation, etc.

Identification Marks

The identification marks are different for each specification, but a combination of letters and numbers is generally required today, this replacing the traditional method of identification by means of modifying the geometry of the notches rolled on the bar. In view of this growing demand for sophisticated marks, rebar producers are looking for equipment able to reach the performance and the quality requested by the market at minimum cost.

How Can These Be Applied?

A new marking philosophy using a machining head mounted on a modern CNC notching machine achieves this goal of a low cost, accurate and flexibility marking tool.

Marking Technologies

If we dismiss hand marking, used even day in some plants - which is in general carried out using grinding wheels sometimes with the help of a mechanical pantograph, the most popular marking is based on the principle of electro discharge machining to mark the roll and thus imprint the resulting rebar.

Marking Using Arc Metal Dischargers

The action of an arc metal discharger is achieved by creating a sequence of intermittent electric arcs to break the metal into minute particles. A hollow branding electrode, fixed on the head of the machine vibrates during the operation while a coolant is injected through the electrode to clean away the powered metal and to cool the working area. The hole created by the arc takes the same shape as the shell of the electrode. Thus the correct mark can be produced by using a sequence of appropriately shaped electrodes.

Modern Arc Machines

Modern arc machines are equipped with programmable repeatable positioning to speed up the location of the electrode along the sequence of grooves in the roll. Since the size and shape of the burned area is the size and shape of the electrode shell it is necessary to use a specific set of electrodes for each rebar size and for each letter/number.

Time to Mark Rolls

The time to burn in each letter approximately 0.6mm deep ranges from less than a minute in cast iron rolls to several minutes in tungsten carbide coated rolls. The overall marking time is much greater than this as several other time demanding manual operations must be performed:

· Roll handling from notching machine to marking machine;

· Electrode centering on the groove and positioning for each letter

· Electrode change for each letter.

Accuracy of Arc Machines

In addition, the accuracy of the surface finish of the mark made by this method is limited by the characteristics of the technology. With the growing demand for quality, this can become a limit in its application.

Electrical Discharge Machining

An alternative to such electro arc disintegrators, sink die Electrical Discharge Machining (EDM) is frequently used. In this case the electrode is solid, and work piece submerged in a dielectric fluid.

Operating Principal

The operating principle is almost the same as before. During operation, the electrode is moved toward the work piece until the space is such that the voltage in the gap can ionize the dielectric fluid and allow an electrical discharge (spark) to pass from the electrode to the work piece. The amount of material removed from the work piece with each pulse is directly proportional to the energy applied, enabling very accurate mark profiling to be achieved if the parameters are properly set. From the quality aspect, EDM meets today’s specifications.

Advantages of EDM Machines

EDM machines are in general more accurate and sophisticated and use two axes CNC to guide the head. They can also work with shaped electrodes, for example shaped to a logo, which reduces the time for indenting. However, the reference plane of the electrode is on a radius that must be equal to the radius of the roll. This ensures more accurate marks produced in a shorter overall time compared to disintegrator machines. A limit in the flexibility of this method is that different electrodes must be used depending on the radius of the roll groove which changes with roll wear and product size.

Processing Tungsten Carbide

Burning marks into tungsten carbide with disintegrators and EDM machines is also still a risky operation because the rapid heating and cooling of the roll surface can cause cracks and micro-craters to appear on the roll surface depending on the machining conditions used. Such heat affected zones (HAZ) can induce cracks caused by tensile stress in a brittle material such as tungsten carbide.

Integrating Notching and Marking

The integration of the two operations of notching and marking into the same machine has been a request from roll shop people for many years. Recently this demand became more urgent due to the growing requirement in international standards for accurate marking.

Problems Integrating EDM

Several difficulties had postponed the combination of a marking device within the roll notching machine. The original approach was to install an EDM in the notching machine. This solution encountered several obstacles. First, the EDM process generates electrical currents that could affect the electronics of the new sophisticated notching machines as well as cause local galvanic corrosion on the moving components. Second, the EDM process uses a liquid dielectric. This required a redesign of the notching machine to collect and recycle this liquid.

A New Approach

A new approach to the problem was investigated with the following aims:

· Make a new device as simple as possible so as to be able to install it on existing machines.

· Improve the quality and the consistency of marking

· Provide the flexibility to meet the different types of marks requested by the market.

· Minimise the time of operation and in particular the operator’s costs.

How It Works

The prototype of such a device was built and tested in the first half of 2001. The IMD is now fitted as standard on all new AT820 E CNC notch milling machines, and can be retrofitted to any AT820 already in operation.

The working principle of IMD is by machining with cutting tools rotating at a medium speed. The rotation is provided by an electric blushless digitally controlled motor.

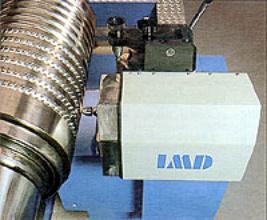
The device is installed on the notching head of the machine (Fig 1). The CNC control is common to both the notching head and the IMD.

AZoM - Metals, Ceramics, Polymer and Composites : Conncrete Reinforcing Bar – A Method for Marking Reinforcing Bar

Figure 1. An IMD marking head mounted on a notching machine.

The software for the IMD is fully integrated on the same platform as the notching machine. A new graphics interface displays all the functions to use both the notching machine and the marking head.

Flexible Programming

The IMD marking head can be easily integrated in the notching programs. The operator screen enables the following parameters to be selected:

· Positioning of letters: between notches or in the place of skipped notches

· Choice of fonts

· Depth of letters

· Height and width of letters as a percentage of the groove dimension

· Angle of the letters

· Tool parameters (tool feed, rotation speed etc).

The parameters requested for the dimension of the mark are not absolute values, but percentages of the groove dimensions. In this way the mark needs only to be defined once for the whole size range of production: a change of size does not require a change of mark program.

Tool positioning and marking operation are automatically performed at the end of the notching cycle, without any intervention by the operator.

Sometime it is required to indent a mark independently from the notching operation. This can happen, for example, when a logo must be marked on rolls already notched, or in a free area without any reference to the notch dimensions. In this case a special program leaves full freedom to the operator in define new marks. The user friendly graphical interface makes this programming extremely simple.

IMD Tooling

The IMD was developed for use on both tungsten carbide and cast iron rolls. It can safely be used on tungsten carbide rolls since the mechanical milling action does not affect its structure. Machining of hard carbides in this accurate application requires tools with PCD inserts, while for cast iron rolls WC (K01 grade) tools will do.

The same tool can create all the letters or logos required. The speed of marking is related to its characteristics. The parameters given in Table 1 are typical for cast iron and tungsten carbide.

Table 1. Typical operating speeds for different materials.

Cast Iron

Tungsten Carbide

Tool Rotation (rpm)

1500

3000

Feed Speed (mm/min)

50

10

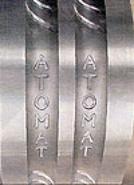
The ATOMAT mark illustrated in Fig 2 is cut into the groove of a tungsten carbide (30% binder) roll. The time taken to create the mark was approximately 12 minutes with the letters cut 0.8mm deep. Accuracy and consistency is assured by the machining technology and the computerised control.

AZoM - Metals, Ceramics, Polymer and Composites : Conncrete Reinforcing Bar – A Method for Marking Reinforcing Bar, a marked roller.

Figure 2. Example identification mark on an 8’ roll for processing 16mm rebar.

Composite Logos

One problem of any marking programming is that it is impossible to foresee all possible logos that may be requested by a customer. In fact, often the mark is not a simple combination of letters and numbers but includes a company’s logo.

This problem is solved by developing software able to translate the ISO file (geode) into a parametric file that can be used by the IMD interface. The logo can be designed on CAD and translated by CAM into an ISO file. Software converts this ISO file into a parametric file usable by the interface. In this way, once the logo is designed and translated, its dimensions can be defined in accordance to the specific rebar size. Thus, it not necessary to design several logos one for each size, but just to input the dimensions and the software will automatically re-scale the logo to the new dimensions.

Thursday, January 11, 2007

Coatings Industry – Materials Testing Services for the Coatings Industry Offered by Bodycote Testing Group

Bodycote Testing Group offers a comprehensive range of services for the testing of wet paints and assessment of coatings - both organic and inorganic.
Services Offered by Bodycote Testing Group for the Coatings Industry

Bodycote Testing Group offer the following services:

· Coatings Failure and Defect Assessments

· Consultation on research and development for new formulations

· Specification Testing

· Third Party Certification
Testing Procedures Offered by Bodycote Testing Group for the Coatings Industry

Testing procedures offered by Bodycote Testing Group include:

· Environmental exposure and immersion testing

· Cathodic disbondment and related tests

· Artificial weathering

· Natural weathering

· Mechanical and physical testing:-

· Wet and dry film tests,

· Abrasion, adhesion, impact, thermal cycling,

· Holiday detection, film thickness,

· Thermal stability, gravel and stone abrasion

Environmental Exposure and Immersion Testing

The degree of effectiveness of a coating system can vary significantly with minor variations in the environment to which it is exposed. In many instances, it is not possible to predict the performance of a coating, in a given environment. The only way to assess the performance of a coating is to reproduce the service environment on a laboratory or pilot scale. We are able to vary UV, moisture, salinity, temperature, H2S, SO2, chlorides and many other specific conditions in order to assess the effectiveness of a given coating.
Cathodic Disbondment and Related Tests

With coatings on steel structures, which are subject to Cathodic Protection, there is a concern that hydrogen can be generated at minor defects in the coating system. The effect of hydrogen evolution and local pH conditions can be Disbondment / Corrosion failure of the system. Disbondment Tests and the associated Adhesion Tests are carried out on samples to mitigate such failure in later service.
Artificial and Natural Weathering

The ability of a coating to retain its properties during atmospheric exposure is often critical from a performance and / or aesthetic viewpoint. Bodycote Testing Group has extensive facilities to test and reproduce various weathering regimes in order to test components and samples for future service performance.
Mechanical Testing

The eventual performance of a coating in service depends on the intrinsic properties and the quality of application of the system. Many defects result from forces applied during manufacture, handling, transport and installation. Coatings must be able to resist such effects and maintain their integrity. In order to confirm integrity, the following tests are often carried out:

· Wet and dry film tests; film thickness, viscosity, hiding power

· Abrasion, scratch, hardness tests

· Adhesion, tensile, peel, impact, flexibility tests

· Thermal stability, thermal shock, thermal conditioning

· Thermal cycling

· Gravel and stone erosion

· Holiday detection
Coating Failures and Defect Assessment

We regularly carry out assessments of failed systems offering an independent opinion and dispute resolution between parties.

One of the primary concerns about coatings is the integrity of the coating system when applied. Bodycote Testing Group regularly test, assess and make recommendations concerning coatings, defects and the “fitness for purpose”.
Consultancy Services

The wide range of experience, in the various coating sectors, of our staff is readily available on a Consultancy basis offering guide formulation for new product developments, sourcing raw materials, and giving advice from conception to implementation.
Specification Testing

Being a well equipped UKAS accredited laboratory, we can offer specification testing either as a one off or ongoing quality control check, help in research and development or as an independent consultant for a third party. Bodycote Testing Group regularly perform test against individual parts of specifications.
Third Party Certification

We can on behalf of a third party looking to introduce either a new product or supplier, test against a complete specification and supply a certificate stating compliance to said specification Bodycote Testing Group have performed tests on behalf of the Highways agency, Railtrack and many original equipment manufactures

Chemical Analysis Services Offered by Bodycote Testing Group

Bodycote Testing Group offers an unrivalled range chemical analysis services. This ensures that Bodycote has the capability to analyse metals, fluxes, gases in metals, residues and fluids. The Group are frequently called upon to provide analytical services on a range of metals including:

· Metals - Ferrous and Non-Ferrous

· Oils - Viscosity and Wear Metal Elements

· Waters and Waste Waters

· Effluents

· Soils
Applications

· Engineering

· Pharmaceutical

· Environmental

· Health & Safety

Recent developments within the group have increased the equipment level, such as Inductively Coupled Plasma - Mass Spectrometry and Glow Discharge.
Testing Services Offered by Bodycote Testing Group

Bodycote Testing Group’s inventory includes: -

· ICP Optical Emission Spectrometers

· ICP Mass Spectrometry

· Industrial Microwaves

· AA Spectrometers, Flame and GFAAS

· Direct Reading Emission Spectrometers

· Direct Reading Hydrogen, Nitrogen and Oxygen

· Gas Chromatographs

· High Performance Liquid Chromatographs

· Glow Discharge OES

The Bodycote Testing Group has recently added three high-resolution solid state ICPs to its array of analytical equipment. These instruments use an electronic imaging chip rather than conventional photomultipliers, hence they can run at the speed of simultaneous ICP yet provide continuous wavelength coverage between 175-780nm.
Samples Tested by Bodycote Testing Group

All forms of sample are forwarded to Bodycote Testing Group, including drillings / turnings, solid samples and liquids.
Bodycote Testing Group’s Services
ICP Optical Emission Spectrometers

The high temperature argon plasma used by an ICP reduces matrix effects, producing straight-line calibrations. This enables low sample weights to be analysed, coupled with its wide calibration range it makes this the most flexible instrument available today.
ICP Mass Spectrometry

ICP-MS is used for the routine analysis of trace elements in drinking waters, ground waters, effluents and soils. ICP-MS is capable of sub-part per billion (ppb) detection for most elements.
Industrial Microwaves

These are used to dissolve samples in sealed Teflon pressure vales to facilitate ICP analysis. This technique has major advantages over conventional dissolution, most notably prevention of volatile element loss, in the analysis of Corrosion Resistant Alloys. The use of industrial microwave technique brings further benefits in time reduction and cost saving.
Flame Atomic Absorption Spectrometers

AA Spectrometers have unsurpassed performance with regard to the analysis of alkali earth metals, as typically required in the analysis of aluminium alloys.
Graphite Furnace Atomic Absorption

These are used to determine ppm and sub ppm levels of residuals in metals. Particularly useful for the determination of low boiling point tramp elements in aerospace alloys.
Direct Reading Emission Spectrometers

These instruments enable the rapid analysis of a wide range of alloys including - Carbon / Low Alloy Steels, Stainless Steels, Cast Irons, Aluminium Alloys, Nickel Alloys and Copper Alloys. Relatively simple sample preparation allows rapid turnaround of results using this technique.
Direct Reading Hydrogen, Nitrogen and Oxygen Instruments

The Group can offer both fusion and vacuum hot extraction techniques for the determination of hydrogen in metals. Oxygen and Nitrogen can also be analysed using fusion techniques.
Gas Chromatographs / High Performance Liquid Chromatographs

Gas Chromatographs / High Performance Liquid Chromatographs are regularly used to analyse volatile organic compounds by the environmental sector.
Glow Discharge OES

Glow Discharge OES can be used for bulk quantitative analysis, where its narrower emission lines, compared with conventional OES, result in fewer inter-element interferences. Due to the uniform sputter profile, the technique is also capable of quantitative depth profile analysis of materials coatings or can be used to determine metallurgical treatments such as carburisation or nitriding.

Wednesday, January 10, 2007

Characterization of Electric Contact on P-Type SiC Semiconductors for Environmental Devices

Electrical properties of ohmic contacts on p-type 4H-SiC were investigated which are dependent on the post-annealing and the metal covering conditions for the environmental electronic device applications. The specific contact resistivity of 4 x 10⁻⁴ ohm cm2 was obtained for Co/Si/Ti metal structures after a two-step vacuum annealing; at 500°C for 600 s followed by 850°C for 90 s. The contact resistance was measured by a rectangular transmission line technique, and the contact resistances were improved more than one order compared to Ti and Co/Ti contacts with one-step annealed process. The Si layer plays a role of diffusion barrier to the intermixing of Ti and Co atoms, which was considered as a major cause for high contact resistance.

Keywords

Silicon Carbide, RF Sputtering, Ohmic Contact, Silicide, Environmental Sensor

Introduction

The development of low-resistance and high reliability ohmic contacts on silicon carbide (SiC) is essential for the environmental electronic devices [1-3]. In the production of the electronic devices, one of the main problems is a formation of reproducible ohmic contacts. The study of ohmic contacts to p-type SiC semiconductor is known to be rather difficult, since it has a large Schottky height. Limited work has been reported about the ohmic contacts to p-type SiC, in which aluminum based metals have been used [4]. The aluminum-based metals have drawbacks of low melting point and high driving force of oxidation in the full procedure of device fabrications. Titanium (Ti) has a relatively high melting point, thus Ti-based metal contacts are attempted in this study. Also, most studies of the ohmic contact to p-type SiC have been performed to 6H-SiC and 3C-SiC rather than 4H-SiC. Recent interest in 4H-SiC for the device production has increased because of its higher electron mobility, and in future environmental SiC devices may be made on 4H- substrates for high performance operations. The Ti ohmic contact to 4H-SiC substrates has been expected to produce a low contact resistivity with thermal stability of their contacts, but it still has a problem of easy oxidation in air even at the room temperature. To reduce the oxidation problem of the contact material, covering layers are deposited on top of Ti layer: Pt and Co.

Experiments

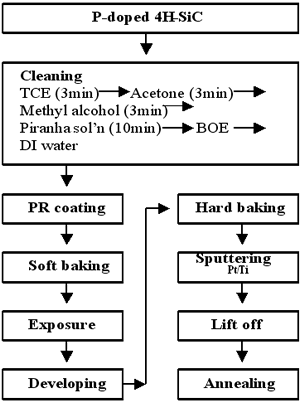
P-type epitaxial layer 3.9 x 1018cm-3 on n-type (2 x 1016cm-3) substrates was used in this study. The thickness of the epitaxial layer was 500 nm. Prior to the metal film deposition, the SiC substrates were chemically cleaned by boiling in trichloroethylene, ultrasonically agitating in acetone, and ultrasonically agitating in methanol, for 5 min each step, to degrease organic contaminations. Huang cleaning (NH4OH:H2O2:H2O = 1:1:5 at 75°C for 600 s; followed by buffered oxide etchant (NH4F, HF) with deionized water rinse after each step) was carried out for more cleaning. Preparation of the metal contact to SiC substrates has been performed with a RF sputtering system, operating at a frequency of 13.56 MHz. Before loading the substrate into the sputtering chamber, the chamber was coated with metal by high purity (99.99%) metal target. This precoating protects sample substrates from possible contaminations from the stainless-steel parts of the chamber during the metal film deposition. After the precoating, the cleaned SiC substrates were placed on the anode plate of the sputtering machine for pump down using a turbo-molecular pump and rotary pump. The chamber pressure before sputtering was as low as 10-7 Torr. With sputtering conditions of an RF potential of 300 W and argon pressure of 30 mTorr, the metal deposition onto SiC was performed. After metal deposition, Si or other metal films were sequentially deposited for searching the practical ohmic contact technologies to SiC substrates. Various metal combinations were attempted: Ti, Si/Co, Co/Si/Ti, Pt/Si/Ti. The thickness of the Ti layer was 50 nm, and that of the Si, Co, and Pt layer was 15nm, respectively. Figure 1 shows a flow diagram of the sample preparation sequence.

Flow diagram of sample preparation

Figure 1. Flow diagram of sample preparation.

Figure 2. I-V characteristics of Co/Si/Ti and Si/Ti contacts on SiC.

Figure 3. Auger depth profile for Co/Si/Ti after two-step annealing.

Rectangular transfer length measurement (TLM) [5] structures of the metal layer were patterned in various sizes using the lift-off photolithography. The patterned samples were annealed in vacuum atmosphere at temperature of 850°C for electrical I-V (current-voltage relations) characteristics measuring.

The I-V measurement was carried out using HP4145 (semiconductor parameter analyzer), and the contact resistivity was calculated using a method suggested in ref. [5].

Results and Discussion

Electrical I-V characteristics of the prepared ohmic contacts on SiC have been measured. Figure 2 shows the measured I-V characteristics for Co/Si/Ti and Si/Ti metal structures on SiC after annealing at 850°C for 600 s under a vacuum of 10-6 Torr. In the figure, the contacts are seemed not to form complete ohmic properties even though it has a symmetrical characteristic. Also, it is recognized that the Co/Si/Ti contact has better characteristics compared to the Co/Ti contacts. This result implies that that the Co layer is effective for the protection of the oxidation both in the annealing process and in the air. From the analysis of Auger electron spectroscopy (AES), the Co/Si/Ti contact film is turned out to contain a small amount of oxygen atoms until the depth of 80 nm. The oxygen probably is due to the long time annealing process at the temperature of 850°C, and two-step annealing was attempted to reduce the oxidation problems.

(a) Ti contact on SiC

(b) Pt/Ti contact on SiC

(c) Pt/Si/Ti contact on SiC

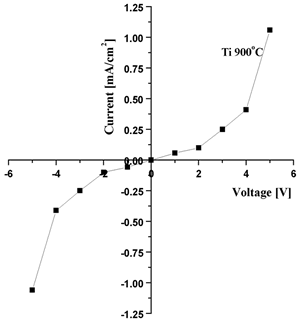
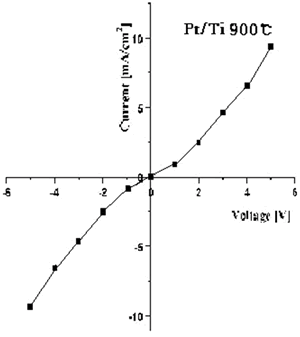
Figure 4. I-V characteristics of the Ti-based ohmic contacts.

The first step of the annealing is a long time process at low temperatures for the intermixing of Si and metal; whereas the second step is short time process at elevated temperature for the final silicide phase formation, which has the lower resistivity. The results of the two-step annealing process present the improvement of the contact resistivity more than one order compared to the samples prepared by the one-step annealing. As seen in Figure 3, Auger depth profile for the sample present that the Si layer is mixed with Ti and Co layer, which may result various silicide phases. It is well known that the TiSi2 and CoSi2 phases have the lowest resistvity among the existing metal silicides.

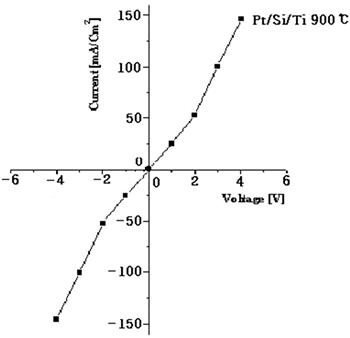
Platinum (Pt) passivation structures were also studied for the Ti-based ohmic contacts on 4H-SiC substrates; Ti-, Pt/Ti, and Pt/Si/Ti on SiC. I-V characteristics were measured by HP 4145 semiconductor analyzer for the metal structures after the two-step vacuum annealing at 500°C for 600 s followed by annealing at 850°C for 90 s. Figure 4 shows the results of the I-V measurements. Ti contact on SiC does not show any ohmic characteristics, and presents very high contact resistivity. The reason for the high resistance may be originated from the easy oxidation property of Ti, and Pt covering was carried out to protect the easy oxidation. The Pt layer was prepared without the vacuum breaking after the Ti deposition on SiC in the same sputtering chamber. The result of the I-V measurements for the Pt/Ti contact on SiC is shown in Figure 4(b. This figure indicates good ohmic property, but the specific contact resistivity is estimated as being in the range of 10-3 ohm.cm2. However, the specific contact resistivity of the Pt/Si/Ti on SiC was calculated as 4 x 10⁻⁴ ohm.cm2, one order improvement of the contact resistance. The result implies that the insertion of Si layer is effective and the layer plays a role of diffusion barrier to intermix Ti and Co atoms, which was considered as a major cause for high contact resistance.

Conclusions

Electrical characteristics of ohmic contacts on p-type 4H-SiC semiconductor substrates were studied for the environmental sensor applications. Three different metal layers have been attempted for the low specific contact resistivity: Co, Pt, and Ti. TLM patterns of the multi-layer structures were made on the SiC substrate by the lift-off process with minimum length of 10 . Best results are obtained as 4 x 10⁻⁴ ohm.cm2 for Co/Si/Ti metal structures after two-step vacuum annealing; at 500°C for 600 s and 850°C for 90 s The contact resistance was measured by a transmission line measurement technique, and the contact resistances were improved more than one order compared to Ti and Ti/Si contacts for the annealed samples at the same conditions. The Si layer plays a role of diffusion barrier to the intermixing of Ti and Co atoms, which was considered as a major cause for high contact resistance. The results of the contact properties are strongly dependent on metal deposition conditions and post-annealing conditions.

Cerium

Cerium was discovered in 1803 by both Klaproth and by Berzelius and Hisinger. However, Hillebrand and Hisisnger produced the metal much later in 1875. It is the most abundant of the rare earth metals and is found in a number of minerals, which include allanite (also know as orthite), monazite, bastnasite, cerite and samarskite. Monazite and bastnasite are presently the two most important sources of cerium.

Metallic cerium is prepared by metallothermic reduction techniques that produce high-purity cerium. Examples of such processes include the reduction of cerous fluoride with calcium, or the electrolysis of molten cerous chloride or other cerous halides.

Cerium is an iron-grey lustrous metal, and is malleable and oxidises very readily at room temperature, especially in moist air. It is the most reactive of the rare earth metals except for europium. Both alkali and acid solutions attack the metals rapidly. The pure metal is likely to ignite if scratched with a knife-like instrument.

Cerium has a variable electronic structure, which means only small amounts of energy are required to change the relative occupancy of the electronic levels. This gives rise to dual valency states. An example of this is when cerium is subjected to high pressure or low temperatures a volume change of approximately 10% results.

Cerium exhibits complex low temperature behaviour. It is believed that there are four allotropic modifications:

· At room temperature and atmospheric pressure is known as g cerium

· Below -16°C g cerium changes to b cerium

· Below -172°C b cerium begins to change to a cerium

· The transformation is complete at -269°C.

Applications

Cerium is a component in misch-metal (German for mixed–metal), which is used in the manufacture of:

· Pyrophoric alloys for cigarette lighters.

· Making aluminium alloys and in some steels and irons.

· In cast iron it opposes graphitisation and produces a malleable iron

· In steels it removes sulphides and oxides and completely degasifies.

· In stainless steel it is used as a precipitation-hardening agent.

· In magnesium alloys for castings it is used from anywhere between 3 to 4% with 0.2 to 0.6% zirconium, both of these refine the grain and give sound casting of complex shapes. It also adds heat resistance to magnesium castings.

Other uses for cerium and cerium containing compounds include:

· As ceric sulphate it is used extensively as a volumetric oxidising agent in quantitative analysis.

· Cerium compounds are used in the manufacture of glass, as a component and a decolouriser.

· Cerium oxide is used as a glass-polishing agent.

· Cerium in conjunction with other rare earth metals is used in carbon-arc lighting, which is implemented in the motion picture industry.

· Cerium is used to store hydrogen as it reacts with it at room temperature to form its hydrides.

Tuesday, January 09, 2007

Ceramics in Dental Restorations – A Review and Critical Issues

Dental ceramics in restorations are essentially oxide based glass-ceramic systems. They have three essential features/requirements:

1. Ease of fabrication of complex shapes

2. Sufficient mechanical and corrosion resistance

3. Appropriate aesthetic appeal.

In the last few decades there has been tremendous advances in the mechanical properties and methods of fabrication of these materials. Whilst porcelain based materials are still a major component of the market there have been moves to replace metal cored systems with all ceramic systems. In this brief review the following topics will be addressed: natural teeth and their properties, alternate restorative materials and the various ceramic compositions and their usage by the dental practitioner. Examples of the microstructure property relationships for these ceramic materials will be addressed.

Introduction

The history of restorative dentistry can be traced back as far as ancient Egyptian times. Examples of tooth replacement prostheses made from gold wire, ox bone or wood have been found. More recent restoratives had a renaissance about two hundred years ago when air fired porcelains and cast gold restorations were made to restore and replace teeth. It seems that in ancient times the main requirement was to replace teeth lost as a result of gum disease, whereas in recent times it is to restore teeth damaged by decay.

Restorations today are largely required as a result of trauma, decay, gum disease and aesthetics. The latter being a more recent area of high demand and one in which ceramic materials play a large role. McLean (1979) provides a concise history of ceramic use in modern dentistry. The use of ceramics for the restoration of teeth has been a part of dentistry's modern period of evolution. This period started in the late seventeen hundreds but major advances have mainly come about this century. The demand for aesthetic restorations led to improvements in ceramic formulation and firing techniques. The types of ceramic systems have been largely summarised by McLean. See also a recent review by Kelly (1997).

Structure of a Tooth

Enamel

Teeth themselves are a complex hard tissue structure originally born from specialised cells called ameloblasts, odontoblasts and cementoblasts. The ameloblasts form the enamel, which is the hard outer coating seen as the clinical crown of the tooth. These cells occur in a layer on the outside of the tooth bud.

The enamel is laid down on the inside of the ameloblasts. When the tooth erupts, these cells are lost and enamel can no longer be formed. This has important implications because any wear or loss of enamel due to decay etc, cannot be repaired by the body.

Dentine

The dentine is formed by the odontoblasts. These cells are on the inner side of the tooth bud, between the enamel and the dental pulp. The dentine is formed by these cells as an inward growth. The dentine could be viewed as the main foundation of the tooth, supporting the enamel, providing protection to the pulp, and through its covering below the gums, giving rise to the attachment via a ligament to the surrounding bone. The dentine has an ability to continue laying down dentine internally at the expense of the pulp chamber size, throughout life. It cannot however, replace dentine that has been physically lost. Figure 1 depicts the lateral view of an incisor tooth.


Mechanical Differences

The mechanical properties and their interelationship of the three hard tissues mentioned above, enamel - dentine - bone, present an interesting method for dealing with stresses applied to the teeth as a result of chewing and also tooth grinding during periods of concentration or psychological stress. The enamel is relatively hard and brittle (E~ 65 - 70 GPa) the dentine much softer and more compliant (E~ 15 - 19 GPa) and bone even more compliant (E~ 12 GPa).

Dental Restorative Materials

As mentioned earlier man has been replacing lost tooth structure with gold and ceramic. The gold and ceramic materials were used because they could be custom fabricated to fit the needs of individual tooth requirements as far as form and aesthetics are concerned. They can be used independently or in combination with ceramic baked onto gold alloy subframes. Other metal alloys are also used in this metal-ceramic technique.

Silver Amalgam

Today as in the past these materials have proved to be relatively expensive for the population masses and alternatives have developed. The first material that was easily produced and relatively inexpensive was silver amalgam. This material, popularised by an American dentist, G. V. Black, in the 1890's has been used very widely throughout the world as a cheap and effective restorative to replace tooth structure lost through decay. The main disadvantages with this material are the concerns over its mercury content and its lack of aesthetic appeal.

Composite Resins and Glass Ionomers

The other two groups of restorative materials to be used widely are the composite resins and the glass ionomers. The composite resins developed in the 1950's when a breakthrough monomer was produced. Known as BisGMA, this resin monomer has become the backbone of most dental composite resins. These materials use various glass or ceramic particles as fillers to enhance their mechanical properties and give them tooth colouring and other aesthetic properties such as translucency etc.

The glass ionomers are a relatively recent development although their predecessor silicate cements have been in use for about the same time as the BisGMA resins. These materials are relatively weak, but are used to cement gold and ceramic crowns to teeth, with other versions being used as direct restoratives, depending on their filler content and the recommended application. They have a major advantage in that their have a reasonably constant fluoride release, acting as a strong decay inhibitor.

Issues Facing Ceramics as Dental Restorative Materials

The aim of this paper is therefore to review the role of ceramics in dentistry. The first consideration is why use ceramics. The reasons are as follows:

· Biocompatibility

· Aesthetics

· Durability

· Relative ease for customised units.

Biocompatibity

The biocompatability issue is essential to prevent adverse reactions within the patients. The dental ceramics in use today have relatively low firing temperatures, usually greater than 900°C and are resistant to dissolution in the mouth. Formulations have been developed with firing temperatures as low as 640°C, however, these materials tend to show considerable surface degradation in the oral environment and hence are not useful.

Aesthetics

Ceramic materials have long been admired for their aesthetic qualities. The use of dentally coloured glasses can provide replacement structures that can be made to imitate tooth structure in both colour, translucency and response to different lighting sources.

Durability

Durability is an area that has led to considerable research for ceramic systems that can provide individually constructed restorations, that are small, unique, inexpensive and will be subjected to cyclic loading in wet and sometimes abrasive conditions. The critical problem for all ceramic materials, not the least those used in dentistry is the huge difference in theoretical strength, based on the covalent nature of their structure, and the usual strengths found in general use (7000-70000 MPa versus 7-700 MPa). This was originally determined by Griffith, who reported that the theoretical strength for all solids could generally be regarded as a constant with a value approximating E/10.

The advances in industrial ceramics for such conditions have been remarkable to say the least, in recent decades. However, nobody is going to allow their front teeth to be restored with a ceramic that is dark grey, black or opaque white. The advances in industrial ceramics have included improvements in fracture toughness, wear resistance, machinability, solubility, hardness and flexural strength. With the exception of hardness, these are the same improvements that have been sought in dental ceramics. Another major requirement apart from aesthetics is that the ceramic not be too hard otherwise abrasive wear of the opposing natural tooth will be too severe.

Failure of Ceramic Dental Restorations

The clinical observations tend to show catastrophic mechanical failure. There are reports that ceramic restorations such as inlays and crowns fail due to occlusal (biting together) injury not unlike that of a small spherical indentation. This has led to at least one group using a small spherical indenter of 2 millimetres diameter as a testing devices to produce similar failures in vitro. Perhaps the most important consideration to note are the possible driving forces associated with stresses formed from elastic components within the field of the initial crack.

Another consideration is the choice of indenter to produce a failure. In general, the contacts between teeth are the same as small spherical indenters, changing with age and wear to broader, flatter contacts. The cusps of teeth are naturally rounded. As teeth become worn they tend to exhibit small milled facets and so the contacts can become much broader. A spherical indenter rather than a sharp indenter is therefore the system of choice when measuring the behaviour of the ceramic system in question.

Ceramic Materials Used in Dental Restorations

This has led to a series of differing ceramic structures available for dentistry, with some examples described below.

The Felspathic Porcelains

Several summaries for the composition of dental porcelain have been written. They cover the composition of felspathic porcelain as a veneering porcelain in all-ceramic and metal-ceramic crowns. They describe a history of modifying the basic Potash Feldspar-Quartz-Kaolinite mix by the removal of mullite and free quartz, while increasing sodium oxide and alkaline earth oxides as bivalent glass modifiers, to improve translucent properties while trying to maintain strength. Fluxing agents have also been added to lower the melting temperatures and make them easier to handle in the dental laboratory. These materials are now substantially glassy and Binns (1983) describes their classification as a porcelain as “somewhat of a misnomer”.


The K2O content was also varied to accommodate the need to match the coefficient of thermal expansion for metal alloys used in dental metal-ceramic techniques. The increase in K2O content allowed a greater proportion of leucite crystals (coefficient of thermal exp. 27 x 10-6/°C) which led to the overall coefficient of thermal expansion rising to something in the order of 13.5 - 15.5 x 10⁻⁶/°C.

The felspathic porcelains used in all-ceramic systems have coefficients of thermal expansion ranging from 5.5 - 7.5 x 10⁻⁶/°C when used over castable glass and alumina based core materials, to 16 x 10-6/°C when used over the newer pressed leucite systems.

The Leucite Systems

Leucite has been widely used as a constituent of dental ceramics to modify the coefficient of thermal expansion. This is most important where the ceramic is to be fused or baked onto metal.

The recent introduction of the pressed leucite reinforced ceramic system, IPS Empress, has leucite in a different role. This material relies on an increased volume of fine leucite particles to increase flexural strength.

Similar versions using finely dispersed leucite grains to increase toughness, strength and modify wear patterns and rates to make them similar to enamel wear rates are now available for metal-ceramic restorations.

The Castable Glasses

The development of glass ceramics by the Corning Glass Works in the late 1950's has led to the creation of a dental ceramic system based on the strengthening of glass with various forms of mica. The Dicor® crown system uses the lost wax system to produce a glass casting of the restoration. The casting is then heat treated or “cerammed”, during which tetra silicic fluromica crystals are formed to increase the strength and toughness of the glass ceramic.

This procedure is designed to take place within the economic confines of a commercial dental laboratory. A second dental version was developed to be used for CAD/CAM dental procedures. This cerammed glass is provided in an already heat treated state from the manufacturer. In this latter technique an optical scan of a prepared tooth is loaded into a computer and a milling system is used to produce the restoration. The restoration is then “bonded” to the remaining tooth structure using a dental BisGMA based composite resin.

The Alumina Based Systems

The Aluminous Jacket Crown

The modern Aluminous Jacket Crown, probably more commonly known as the Porcelain Jacket Crown (PJC) was popularised in the mid 1960’s by McLean. This report also points out the importance for the use of alumina in dental ceramics and how it modifies the flaw systems at the surface and within the ceramic. The aluminous porcelains reported by McLean are also very prone to strength degradation when they contain porosity.

Pure Alumina Core - Heat Cured After Pressing

The Nobel Biocare company from Sweden have introduced two systems that essentially use a system of pressing alumina onto a metal die, removing the pressed shape from the die and then sintering it. One system is used to make alumina profiles that are then used as cores to build up ceramic superstructures for single tooth implants, CeraOne®, and the second is to make cores for conventional crowns, a process known as Procera®. Unlike the other dental ceramic materials, there is no glassy phase present between the particles. Feldspathic veneering porcelains such as Vitadur Alpha@ and Duceram® are then fired onto this alumina core to provide the colour and form for the restoration.

The Glass-Infiltrated Alumina System for Cores

During the 1980’s, Dr. Michael Sadoun and Vita Zahnfabrik, developed a slip casting system using fine grained alumina. The cast alumina was sintered and then infiltrated with a Lanthana based glass. This provided a glass infiltrated alumina core (In-Ceram®) on which a felspathic ceramic could be baked to provide the functional form and aesthetic component of the restoration. In-Ceram has the highest flexural strength and fracture toughness of all the currently available dental ceramic systems available to most commercial dental laboratories. The system also has the greatest versatility for dental use of any metal free ceramic restorative.

The driving force for these developments has been the immense difference in reliability between metal-ceramic systems and all-ceramic systems and a public perception that metal-free restorations are more aesthetic. The disadvantages of the metal ceramic systems include radiopacity, some questions centring around metal biocompatibility and lack of natural aesthetics; important features in today's consumer conscious dental market. Typical mechanical properties of dental ceramics and tooth structures are listed in Table 1.

Table 1. Strength of tooth structures and dental ceramics.

Material

Flexural Strength (MPa)

Fracture Toughness (MPa.m-2)

Porcelains

Feldspathic

60-110

1.1

Leucite

120-180

1.2

Glass Ceramics

Lab cast/Cerammed

115-125

1.9

Premade/HIP

140-220

2.0

Alumina

Alumina/Glass Infiltrated

400-600

3.8-5.0

Spinel/Glass Infiltrated

325-410

2.4

Tooth Structures

Dentine

16-20

2.5

Enamel

65-75

1

These are examples of the different directions that have been chosen to improve mechanical properties while maintaining aesthetic and economic considerations.

Types of Dental Restorations

The types of restorations involved include:

· Simple Feldspathic Veneers

· Porcelain Jacket Crowns and Bridges

· Metal-Ceramic Crowns and Bridges

· Inlays and Onlays

· Implant Superstructures.


Veneers

The simple veneers are essentially an enamel replacement used mainly for aesthetic reasons on anterior teeth. They are approximately 0.5 mm thick and are glued or “bonded” to the tooth using a dental composite resin. They are very reliant on the mechanical integrity of the supporting tooth to provide enough stiffness to prevent loads flexing the restored tooth and exceeding the critical strain limit of the ceramic veneer. In general, dentists are not aware of the flexibility range for teeth and these restorations are often inappropriately used.

Porcelain Jacket Crowns

Porcelain Jacket Crowns are a more extensive restoration. These are used to replace virtually all the enamel component and some dentine. This means that they are almost always supported by dentine in a vital tooth, or cast gold in a non-vital tooth. They are at least 1 mm thick and depending on the system used are either made from a single material, as found in Dicor and IPS Empress crowns or are bilaminar such as In-Ceram® and Procera Crowns. In-Ceram® and Procera® use variations of alumina as a toughened and high strength underlying core to support feldspathic veneering porcelain which gives the final shape and aesthetic attributes required for the restoration. In-Ceram® and Procera® are also the only systems that can be used to construct three unit bridges, where missing tooth is replaced using the adjacent teeth as abutments.

Metal-Ceramic Restorations

Metal-ceramic restorations as described earlier use an alloy, originally based on gold, to form a tough and rigid base for the veneering ceramic. This ceramic usually contains leucite as a coefficient of thermal expansion modifier to reduce stress between the metal and ceramic during the firing process. The modern versions are now using finer and denser dispersions of leucite to improve mechanical properties for wear and flexural strength.

Inlays and Onlays

Inlays and onlays are made from a variety of the systems mentioned above, with no real preference, although systems containing dispersions of leucite seem to be gaining ground.

General Discussion

Implant superstructures can be made using the metal-ceramic systems or the alumina based ceramic systems.

Despite the substantial improvements in the mechanical properties of dental ceramics there is still an unacceptable degree of failure of these materials in service. These failures often arise because of the dentists and technicians attempts to achieve aesthetic design, particularly of complex multi-tooth bridges. Other failure mechanisms are due to impact failure from opposing teeth or high localised stresses due to hard particulates caught between the teeth, poor adhesion between the ceramic and the underlying tooth or metal support. There is still considerable scope for the further improvement of dental ceramics but not without very careful consideration of the aesthetics and simplicity of fabrication.